RIP Halloween 2022

This has been a really hard few months, everything from being attacked by a pit bull and spending 15 days in the hospital, to being hit by the catastrophic hurricane Ian, (and more in between), let's just say real life is WAY scarier than Halloween! 

We're still without internet and posting is a challenge using our unstable hotspot, but I have to make at least one post so I can THANK EVERYONE who participated in the 
Whimsy Stamps 
"Do You Dare, Deb" Halloween hop for me on these posts Instagram, YouTube, and the Whimsy Stamps blog

Understandably with all the hurricane devastation 2022 has to fall into a non-Halloween year. So I can't thank Denise and our amazing design teams enough for not letting my favorite holiday go by entirely and for making me feel so cared about. 
THANK YOU SO MUCH! 
 
So before I start crying, let me share with you my Jack Skellington Halloween slimline card using all Whimsy Stamps goodies that I designed for our 2022 Halloween season.  


On an 8.5x3.5 black slimline card base I adhered one of the patterns from the slimline Terror 1 toner card fronts trimmed down to 8.25x3.25. I'm just gonna say it...our toner card fronts are the best on the market...you seriously have to try them, they foil amazingly! But for this specific card I just wanted it to be black and white so I decided not to add any foiling. Looking back I could have added black foil (der) but I'm happy with how it turned out as it is.

I die cut the Decrepit Grave (love this die!) from grey cardstock while also using the debossing die at the same time that it was die cut. The debossing is what gives that cool scrolling and RIP effect at the top of the tombstone.


For my "Jack" I modified our spooky cool Scarecrow die by simply cutting it apart to get the three separate letters that spell out "HAL LOW EEN".  Then just cut of his arms (lol) and layered his creepy hands back on top of the cut off stumps so that it would fit nicely across the width of a slimline card.

Oh and I can't forget that I chopped off the scarecrows pumpkin head and replaced it with the skull that comes with the Decrepit Grave die set. I think this achieved a pretty cool "Jack" what do you think?


The rose/flower is from the Wild Weeds die set, I cut it out once from black cardstock and once from red cardstock then glued just the red flower top onto the black piece. 


The heart is from our Gothic die set, and I added the "stitches" with a black pen.

R.I.P Halloween 2022
I hope you all have a safe and HAPPY HALLOWEEN!!

Thanks for stopping by


Roar My Baby Saur

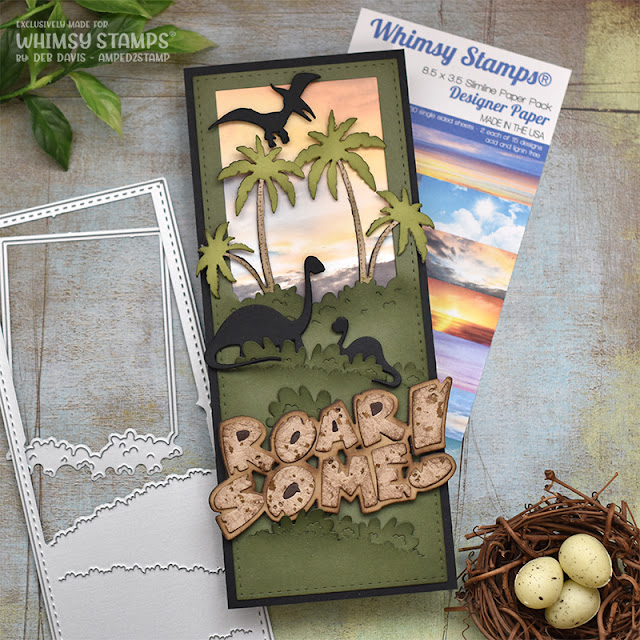
I don't have time to post much (except for Halloween of course) but how could I not post this adorable Whimsy Stamps Roar my Baby Saur die set especially on Mother's Day?
 

I started out using the slimline Meadow die (one of my die collection staples) and used it to cut out the frame and the bushes from a dark green cardstock. Then sponged around all the edges with a darker green ink.


I backed the opening with a piece of slimline Glorious Sky patterned paper...how quick and cool our papers make for awesome backgrounds.

The palm trees were easy peasy too using the Build-an-Island die set and just layered with different colors and tucked behind the opening. Oh for the tan trunk layer I stamped that using the Burlap rubber background stamp (another one of my stash staples).


The Roar My Baby Saur dino's were simply cut out of black card stock and tucked behind the bushes.


To make the Roarsome word I did a faux leather technique by spritzing a pieces of tan cardstock with water then crumpled it up, opened it and crumpled again a couple of times, then flattened it out and splattered some brown ink onto it. Once it was dry I die cut the words and sponged on some brown ink around the edges. The shadow was cut from a plain piece of cardstock and sponged with brown ink too and I backed the letter openings with dark brown cardstock. 


For the final touch I added the pterodactyl from the Roaring die set who looks like he's landing on one of the palm trees - tee hee. BTW, did you notice there's not one stamp on this card...I'll try and share another dinosaur card using dies only sometime soon. Happy Mother's Day...I miss you mom💔
 
Thanks for stopping by...see you soon,


SurReally Cool Hourglass Shaker & Winners Announced

HAPPY HALLOWEEEEEN! 
It's my favorite day of the year, so what better day to share with my fellow Halloweeners how I made one of my all-time favorite cards?!

 And if you haven't checked already, I have a link at the end of this post for you to find out all the winners from all our 31 Nights of Halloween festivities.


This card came together super easy using the slimline SurREALLY Cool Halloween papers, and the killer cool new slimline Hourglass die

I trimmed the (girl) SurReally Cool Halloween paper down to 2.75 x 8.25 and added it to a black card base. Prepping for my shaker card, I trimmed the sunburst paper down to 3.25 x 8.25 and used the slimline Hourglass die to cut out the hour glass shape from the center. Then added clear acetate to the back and then foam tape all the way around the hourglass shaped opening, making sure there were no gaps/openings that would allow any shaker pieces to escape.


I die cut the black spindles, the hourglass topper, and the hourglass base pieces twice each and glued the matching pieces together to make them each two layers thick. I like the stability and dimension of stacking dies and I typically do that with all my die cut pieces often even more than two layers.

 Once I had them stacked I added some foam tape to the back of all the pieces (except the two feet). For the two feet I just kept those a single piece each because I didn't need the dimension for those.  

(*I fully assembled the hourglass before adding it to the card front.)


On the card base I added the Sprinkletz shaker pieces that I wanted toward the bottom of the girl, then placed the foam backed sunburst hourglass piece on top. Then carefully placed the fully assembled black hourglass to the front. 

My final step was to add the black feet using tweezers to easily tuck them underneath the base. 

This is just one of the many ways to assemble/use the Slimline Hourglass die, there are so many cool options for this die, I hope you find it as fun and easy as I do. And I hope you have a HAPPY HALLOWEEN! Until next year my friends...Mwaaaahahahaaa!

And don't forget to check out the Whimsy Stamps blog to see all the winners from our annual super spooktacular 31 Nights of Halloween event, maybe it's you?!


Thanks for stopping by...see you soon,


Back to Top